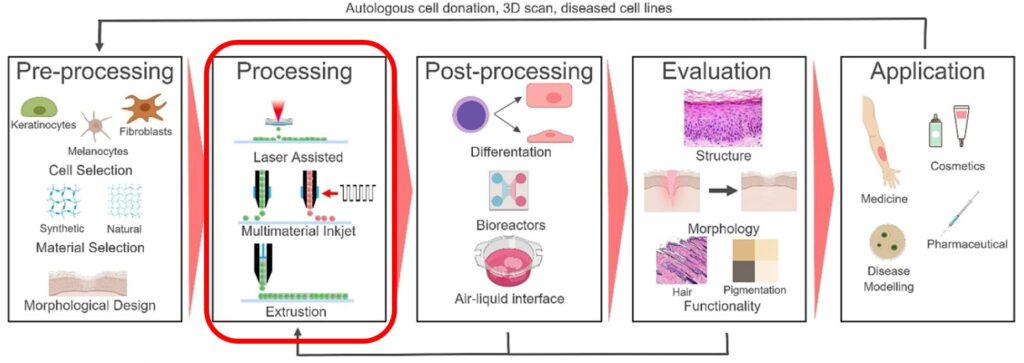
This article deals with the optimization of the 3D bioprinting process. The upcoming articles will cover the crosslinking of printed structures and post-printing evaluation. The cover picture of this article shows an example of 3D Bioprinting process steps (source: Regenerative Medicine Frontiers Journal article: Regen Med Front. 2019;1:e190004).
The three basic steps in the 3D bioprinting process include:
- Pre-printing/pre-processing. This includes the selection of cells and bioink materials, mixing of the ingredients, and creating the 3D design. (This step has been covered in article 2/6).
- Bioprinting using one or more of the available printing technologies to bioprint a tissue construct and crosslinking to maintain a stable structure. (Part of this step was covered in the previous article, and the optimization is covered here).
- Post-printing. This phase includes the cultivation of the tissue structure in a bioreactor. The printed construct is then mechanically tested and evaluated. Finally, the construct can be used for the intended application. (These steps will be covered in our future blog articles)
In order to maximize the achieved resolution and repeatability of the printing process, it is essential to optimize the printing parameters. Various interrelated parameters should be optimized, such as extrusion pressure, write speed (or printing speed), and the z-stepping height between layers. First, the extrusion pressure should be set to achieve extrusion of continuous filament. Next, the writing speed or the movement speed of the nozzle should be matched with the extrusion rate of the filament. Typically, the filament diameter or width doesn’t depend on the extrusion pressure; instead, it is determined by the nozzle size. Hence there is usually no need to play with the pressure to change the filament diameter.
Figure 1. Various steps of the printing parameter optimization. (Source: O’Connell C. et al. (2020) Characterizing Bioinks for Extrusion Bioprinting: Printability and Rheology. In: Crook J. (eds) 3D Bioprinting. Methods in Molecular Biology, vol 2140. Humana, New York, NY. https://doi.org/10.1007/978-1-0716-0520-2_7).
One of the most challenging and most critical parameters to optimize is the distance between the nozzle and substrate. If the first layer height is set too high, unrecognizable blobs may of bioink result as the filament is not attaching to the surface properly. On the other hand, if the height is set too low, the nozzle will squash the printed filament leading to decreased line width and resolution. The correct layer height depends on the nozzle diameter and is affected by possible deformations of the layers due to gel-substrate interactions and gravity. As a rule of thumb, the z-step height is approximately half of the nozzle diameter. However, the first layer, i.e., gel on the substrate, should be determined separately as it typically differs from the subsequent layers, i.e., gel on top of the gel.
Many of the bioprinting systems, especially air-pressure based extrusion, suffer from the significant lag time between the onset of the extrusion pressure and the onset of actual extrusion of the bioink. In addition, there can be a log time between switching off the extrusion pressure and the discontinuance of the actual bioink extrusion. These lag on and lag off timing can be quite detrimental to the printed structures as part of the layers might not be printed at all, and in some parts, the material may be over extruded. Hence, they should be determined and compensated in the bioprinter software.
After performing all the above-mentioned parameter optimization steps, the printing process should yield successful results, and the next step would then be stabilization of the printed object via solidifying the pre-gel.
What is Bioprinting – Part 5 of 6
In the next article on What is Bioprinting, we learn about different crosslinking techniques to solidify the printed structure to hold its shape.

