This article deals mostly with the Pre-printing step of 3D bioprinting and the upcoming articles cover printing technologies and post-printing phases. The cover picture of this article shows an example of 3D Bioprinting process steps (source: Regenerative Medicine Frontiers Journal article: Regen Med Front. 2019;1:e190004)
The three basic steps in the 3D bioprinting process include:
- Pre-printing/pre-processing. This includes selection of cells and bioink materials, mixing of the ingredients, and creating the 3D design.
- Bioprinting using one or more of the available printing technologies to bioprint a tissue construct and crosslinking to maintain a stable structure.
- Post-printing. This phase includes cultivation of the tissue structure in a bioreactor.
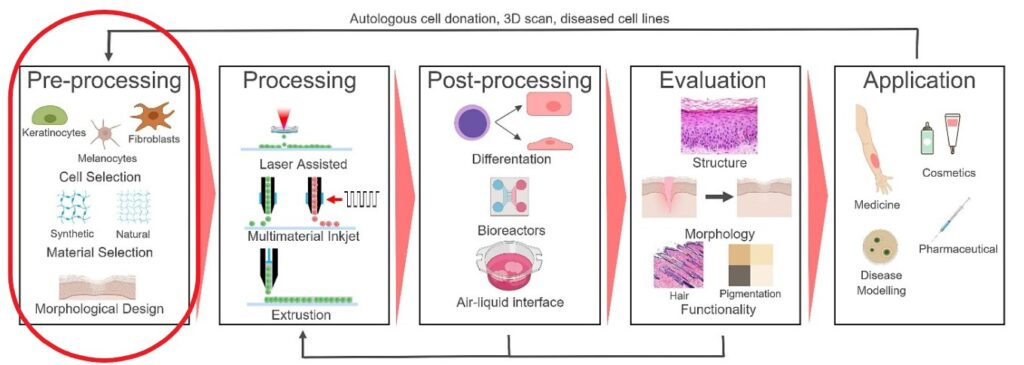
The construct is then mechanically tested and evaluated. Finally, the construct can be used for the intended application. In the main picture of this article, we can see an example of these process steps (source: Regenerative Medicine Frontiers Journal article: Regen Med Front. 2019;1:e190004).
Pre-Printing
The bioprinting process starts from designing and creating a digital file for the bioprinter to read. The files for creating medical implants are often based on Computer Tomography (CT) or Magnetic Resonance Imaging (MRI) scans or can be drawn from scratch with a CAD software. After creating the model, the model is translated into a standard 3D printer file (.STL) that describes the outer surface of the modeled object as adjacent triangles. The STL file is not, however, a file that can be directly printed. It only describes the outer surface of the modeled object. The Printer also has to know what is to be printed inside the surface. To achieve this, one needs a computer program that slices the object into printable 2-dimensional planes. One can simply open the STL file with one of these slicing programs and save the file as a GCODE file. The 3D printer is able to print from the GCODE file
Materials for Bioinks
Bioinks and the components added to them can be a challenging field of expertise. Essential biomaterial properties include printability, mechanical properties, biodegradation, cytocompatibility, and modifiable functional groups on the surface.
Both natural (bio-derived) and synthetic (human-made) polymers can be used in bioinks, however, natural materials are preferred due to their better biological properties despite the fact that they often possess insufficient mechanical properties.
The most commonly used material is alginate, followed by gelatin, hyaluronic acid and polyethylene glycol (PEG). The hydrogels can imitate for example the modulus of elasticity of the soft human body tissues. The toughest tissues, like bone or teeth, require other materials, such as thermoplastic polymers filled with hydrogels. It is easier to control the molecular weight and distribution of the synthetic hydrogels than the natural hydrogels. This makes it possible to have acceptable control of the mechanical properties of the printed tissues. Natural hydrogels are more difficult to manipulate but using them makes it easier to mimick the original cell environment. They are naturally bioactive, creating a rich environment for cell and tissue integration.
The Biofabrication Window
When choosing the bionks, traditionally a compromise must be made between the suitability for fabrication (printability) and the ability to encapsulate cells and maintain their viability. Many bioinks lack the ability to carry their own weight to achieve structural and shape stability, or their printability is low due to too high or too low viscosity. What is more, their biocompatibility is not necessarily very good and the viability of the cells suffers as the bioink’s stiffness or crosslinking increases.
Printability
Printable bioinks have several requirements for their printability, which makes it possible for the bioprinter to succeed in its print job. The materials must
- be pseudoplastic or shear-thinning, meaning that as the shear force increases, the viscosity falls
- form a continuous, minimum 5 mm long filament, when exiting the printing needle, not just droplets
- hold their original shape (shape fidelity) without mixing with other layers even when several layers are printed on top of each other
- mimic the intended design at an acceptable level
Printability can be tested in several ways, for example by printing grid structures and measuring the formed pore’s or void’s dimensions and calculating the printing accuracy P using a formula created for this purpose.
Future bioinks will perform significantly better with regard to both printability and biocompatibility. This is achieved through modifying the inks’ physical, chemical, and biological properties, for example viscosity, geling and biocompatibility. The field of bioink development is one of the hottest research areas of biotech today.
What is Bioprinting – Part 3 of 6
In the next article on What is Bioprinting, we learn about the 3D bioprinting techniques.